Trouser Stitching:
First of all I trace the trouser block size 12. For the very first time its really hard for me to understand it how to stitch and how to make it good well then I trace my block on the paper as you can see in the picture.
After that I don’t want to make it simple trouser. I wanted to make it Bell Bottom trouser then I looked at some pictures.
According to my level I add 4cm on the hem line on the both sides of the back and front trouser to make a bell shape and join the 4 cm points with the knee line and gave it a smooth curve.
As you can see the picture.
And I mark the notches then I add the seam allowances on the Side seam 2cm on the hem line 3cm and inside leg I added 2cm seam allowance and 1cm on the waist then I mark the Grain Line and cut the pattern with the seam allowances.
After cutting my pattern I place my pattern on the Fabric. Fabric name was Cotton and color was maroon. Placing my pattern on the fabric I trace the pattern with the help of fabric chalk, Front was cut into 2 back as well and I cut the fabric.
Then I started to stitch the trouser first I stitch the trouser front and back darts to handle and understand the trouser shape.
The darts was very nicely stitched and was perfect because I pin the darts properly and then stitch them. After stitching the darts I pin the front inside leg with the back inside leg and stitch them then I stitch the side seams of the front and back. After stitching the inside leg and the side seams I got the real shape of trouser and I was so happy to see the bell shape as I wanted to make then I started to stitch the crotch line which was looking very difficult for me well I pin the both back and front then stitch them on the crotch line was very difficult and I got fault in the stitching as well then I ripped it from the between and started with the back and joined the stitching.

I wanted to add the zip on the side seam so I ripped the right side seam almost 20cm and tried to stitch the hidden zip with the hidden zip foot. As I did in the last dress I did same in the trouser I stitched the zip and was perfectly hidden then I fold the waist seam allowance 1cm .
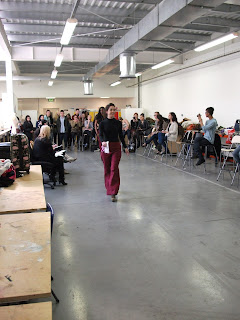
I got the Bell Bottom Trouser shape as I wished then I stitch some flowers and butterflies on the right front of the trouser was looking nice to me. After that my friend modelled for me. As you can see in the picture.
Questions:
-Work as a garment?
Yes, it is wearable and casual wear as well.
-Is it Fashion? If so why , If not why not?
It is a fashion, in 60's Bell Bottom trouser was so popular was an important part of fashion as well as for 60's era well it is very comfortable to wear anywhere gives you very elegance and stylish look.
-What opening did I use?
I used hidden zip on the right Side Seam (S.S).
-What were the problems?
I faced the one and only problem on the crotch line but I handled it properly.
-What could I do to improve next time?
For the next I will make more tough design so I can improve my pattern skills.
-What was the Fabric?
Fabric Maroon Cotton
-How much Did I use?
I use 2 meter.
-How much did it cost?
Its cost me 9pounds 50pence 2 meter .
-Where was it sourced?
Fabric was sourced from 50 Goldhawk Road, Shepherd's Bush London, W12 8DH
REFERENCES


